Learn how to record your screen securely with Recordit in this post.
Screen recording has become an essential tool for professionals, educators, developers, and support teams.
Whether you’re creating a software demo, reporting a bug, or recording a walkthrough for a colleague, screen recording offers a fast, visual way to communicate.
However, recording and sharing your screen can also pose serious privacy and security risks, especially when sensitive information is involved.
This is where Recordit comes in—a lightweight, easy-to-use screen recording tool designed to simplify sharing without compromising your digital safety.
In this guide, we will introduce Recordit and its features, and show you how to use it to record screen securely.
The Safety Risks of Screen Recording Extensions
Many users opt to record their screen using free browser extensions like Screenity, Screencastify, or various Chrome plugins.
While these tools are convenient, they often run persistently in the background and have deep access to your browser activity, tabs, microphone, and webcam. This introduces several safety concerns:
Risks of Screen Recording Extensions:
- Invasive Permissions: Most extensions require permissions to access your entire screen, browser history, or microphone, which could be misused or exploited.
- Data Storage Concerns: Recordings may be uploaded automatically to cloud servers without full transparency about storage locations or retention policies.
- Privacy Issues: You may inadvertently capture private messages, passwords, financial information, or sensitive documents.
- Malware Risks: Some lesser-known screen recorders can be trojanized or used for spying, especially if downloaded from unofficial sources.
For security-conscious users, relying solely on browser-based recorders isn’t always ideal. Instead, a desktop-based, minimal-permission tool like Recordit offers a more secure and transparent experience.
What is Recordit?
Recordit is a minimal and efficient screen capture tool compatible with Windows and macOS, enabling users to record any screen activity and export lossless-quality video or audio files.
Before using Recordit, let’s dive into the key features of the software:
- Privacy-First Approach: No automatic uploads, user tracking, or hidden data collection—your recordings stay private.
- One-Click Recording: Simply select the area you want to capture and start or stop recording with a single click.
- Flexible Recording Modes: Easily customize your capture area, and include webcam, microphone, or system audio as needed.
- High-Performance Capture: Record high-quality (Up to 4K) screen activity and export your recordings in just seconds.
- Supports Multiple Formats: Save your recordings in popular formats like MP4, MP3, GIF, and more.
- Annotation Tools: Add simple annotations like mouse clicks or drawing on the screen to highlight important parts of your recording.
- Customizable Hotkeys: Set your own keyboard shortcuts for starting, pausing, and stopping recordings to streamline your workflow.
- Multiple Language Support: Recordit supports multiple languages for a wider user base.
- Cross-Platform Compatibility: Recordit runs smoothly on both Windows and macOS.
How To Record Your Screen Securely With Recordit?
Ready to capture your screen securely? Follow these steps to use Recordit with privacy in mind.
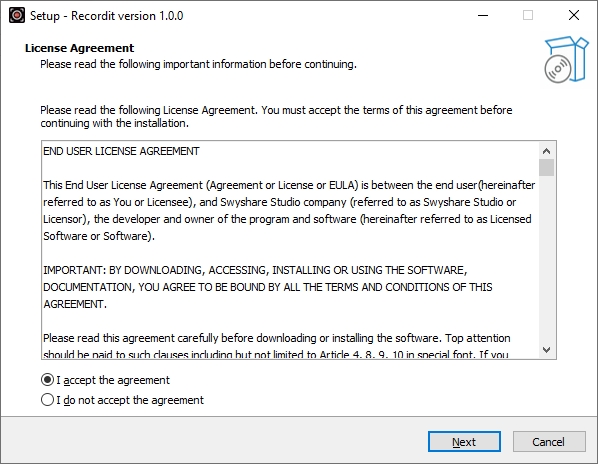
Step 1: Download Recordit from Official Website
Go to Swyshare Recordit official page to download the appropriate version for your operating system and complete the installation process.
Step 2: Configure Recording Settings
Launch Recordit and adjust your settings directly from the main interface—select the output resolution, file format, and save location. Then, select the recording mode that best fits your needs (screen area, webcam, audio, etc.).
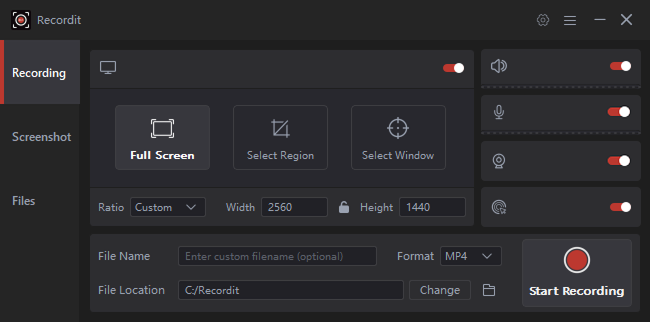
Step 3: Start and Stop Recording
Click the “Start Recording” button to begin capturing your screen, and click again to stop when you’re done.

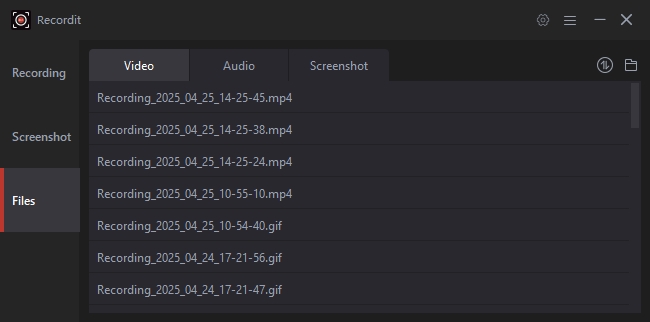
Step 4: View and Manage Recordings Locally
All recordings are organized in the “Files” tab within Recordit. From there, you can easily open, review, and manage your files for offline use.
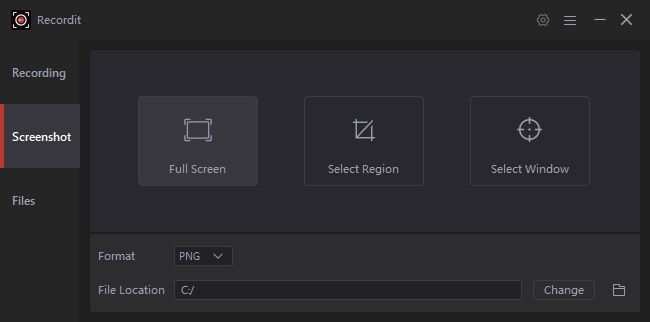
Step 5: Take Screenshots
To take a screenshot, go to Recordit’s “Screenshots” tab, configure your settings, and capture a still image with a single click.
FAQs
Is Recordit secure and private?
Yes. Since Recordit doesn’t transmit or store your files over the internet, it avoids many of the privacy pitfalls associated with cloud-based screen recording tools.
Is Recordit free to use?
Yes, Recordit offers a free version that lets you try the features before purchasing.
How long can I record with Recordit?
The free version of Recordit allows recordings of up to 10 minutes, while the Pro version removes this limit for unlimited recording time.
Can Recordit record system audio and microphone simultaneously?
Depending on your system and configuration, Recordit supports capturing both system audio and microphone input simultaneously, useful for commentary or tutorials.
Where are my recordings saved?
All recordings are saved locally on your device in the file location you specify in the settings. You can access and manage them anytime through the “Files” tab in Recordit.
Is technical support available for Recordit users?
Yes, users can access tutorials on the official website and contact the support team directly via email for assistance.
Conclusion
Screen recording doesn’t have to be a privacy risk. While many tools prioritize convenience over control—automatically uploading your content and accessing your full system—Recordit takes a local-first approach, giving you complete ownership of your files.
By storing recordings only on your device and avoiding cloud servers entirely, Recordit offers one of the safest and quickest ways to capture your screen. Whether you’re working on confidential projects, creating private tutorials, or reporting sensitive bugs, Recordit lets you record securely and share on your own terms.
If your priority is security, privacy, and simplicity, Swyshare Recordit is the ideal choice. With no cloud syncing, no invasive permissions, and a fast, intuitive workflow, it’s a dependable screen recording tool for personal and professional use.
Meet Angela Daniel, an esteemed cybersecurity expert and the Associate Editor at SecureBlitz. With a profound understanding of the digital security landscape, Angela is dedicated to sharing her wealth of knowledge with readers. Her insightful articles delve into the intricacies of cybersecurity, offering a beacon of understanding in the ever-evolving realm of online safety.
Angela’s expertise is grounded in a passion for staying at the forefront of emerging threats and protective measures. Her commitment to empowering individuals and organizations with the tools and insights to safeguard their digital presence is unwavering.